As an Amazon Associate, we earn from qualifying purchases. Some links on this site are affiliate links at no extra cost to you. Our recommendations are based on thorough research and editorial judgment.

How Planer Snipe Occurs and Prevention Techniques
Planer snipe can be a real headache when you’re trying to get that smooth finish on your workpiece. It happens when uneven forces cause the ends of your boards to end up deeper than the middle. Misalignment and pressure issues are usually to blame. If you’ve ever dealt with this, you know it can mess up your whole project.
So, what can you do to keep snipe at bay? Start by making sure the infeed and outfeed tables are level with your planer bed. That little adjustment can make a big difference. You might also want to work with longer boards; they tend to stay more stable through the cutting process.
Here’s a helpful tip: try feeding your material slightly elevated. This technique helps counteract that annoying end lift that causes snipe.
Another handy trick is to use sacrificial boards. They act as a buffer, absorbing some of the pressure from the rollers and helping to keep your workpieces level. If you’ve got a Cutech 40200H, don’t forget about the SNIPE LOCK feature — it can save you a lot of trouble.
Honestly, taking these steps can lead to the pristine finishes we’re all after.
Wrapping it all up, preventing planer snipe is about making some simple adjustments to your setup and using a few clever techniques. Take a moment to check your equipment and practice these tips. What’s your go-to method for avoiding snipe?
Key Takeaways
- Planer snipe occurs due to misalignment, uneven feeding forces, and improper pressure from infeed rollers, causing deeper cuts at the ends of workpieces.
- Utilizing sacrificial boards can help absorb uneven forces and reduce the risk of snipe during planing.
- Preparing and leveling the infeed and outfeed tables with the planer bed ensures even cuts and minimizes snipe occurrence.
- Feeding the material while slightly lifting its free end counters end lift, further preventing snipe.
- Regular visual inspection and tactile assessment of workpiece thickness can help identify and manage snipe effectively.
Why You Should Care About Planer Snipe

Have you ever noticed those pesky deeper cuts at the ends of your workpieces after using a planer? That’s what we call planer snipe, and it’s something every woodworker should pay attention to. It can really affect the quality and look of your project, making it less than perfect.
To keep snipe at bay, make sure your rollers and support are properly aligned. Consider using sacrificial boards—these can act as a buffer and help prevent that unwanted snipe. If you do end up with snipe, don’t fret too much. You might just need to spend some time trimming or sanding it down, but keep in mind that this can shrink the size of your workpiece.
Here’s an important tip: keeping a consistent feeding speed is key. When the pressure during planing isn’t even, snipe can sneak in. So, it pays to be mindful of how you’re feeding your material.
So, why does this matter? If you want your woodworking projects to have that professional touch, getting a handle on snipe is crucial. By using these simple strategies, you can improve both the efficiency of your work and the overall aesthetic of your projects. Understanding the role of material durability can also enhance your maintenance techniques and tool performance.
Common Causes of Planer Snipe

Ever dealt with planer snipe and felt like tossing your tools out the window? You’re not alone. This pesky problem can really throw a wrench in your woodworking projects, but understanding what causes it can set you on the path to smoother planing.
Snipe often happens because of uneven forces when your board slides under the infeed and outfeed rollers. If that infeed roller isn’t applying the right amount of downward pressure, your board might end up curving, leading to those frustrating deeper cuts at the ends. It’s like a little surprise you didn’t ask for! And then there’s that pesky cutter head—if it’s inconsistent or misaligned, you may run into even more trouble, especially if the board isn’t parallel when entering or leaving the machine.
Another thing worth checking is the tension of those compression springs inside the planer. If they’re not pulling their weight, you could be setting yourself up for snipe. So, what can you do about it?
Try this: use sacrificial boards at both the beginning and end of your workpiece. They can really absorb those uneven forces, which helps mitigate the risk of snipe. Plus, this little trick can improve your overall planing success and keep those end cuts nice and clean.
To wrap it up, snipe is one of those challenges every woodworker faces from time to time. But with a little attention to pressure and alignment—and a couple of sacrificial boards—you can tackle it head-on. What’s the craziest snipe story you have during your woodworking adventures?
Using tools with shock absorption features can also help reduce the impact of uneven forces and improve your planing results.
Recommended Products
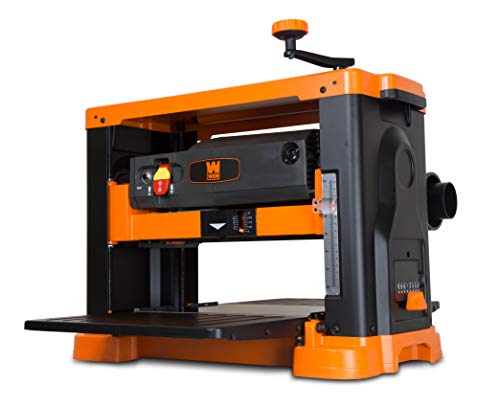
Plane boards up to 6 inches thick and 13 inches wide

High-quality 13" Widened Worktable: Plane boards up to 6" thick and 13" wide. Easily adjusted tables and extensions for coplanar with table pull-out extensions, supplying 35" of total length for better support on the long stock. Precision machined cast iron bed and steel plate assist in keeping boards flat. Get your boards cut the way you want in no time.
Dual-Roller Feeding System: Sturdy dual rollers advance boards with precision, reducing vibration and alignment issues for flawlessly straight cuts. Paired with three sharp HSS blades, this thickness planer delivers glass-smooth edges free of splinters
Understanding the Anatomy of a Planer
Have you ever struggled with getting a perfectly smooth finish on your woodworking projects? Understanding the anatomy of your planer can really help you tackle that problem head-on.
A typical planer has a cutter head located between two rollers: the infeed roller and the outfeed roller. These parts are crucial for how well the machine works. The infeed roller pulls the wood steadily into the planer while also pressing it against the bed for consistent cutting. This is where you want to keep an eye on pressure, as too little or too much can affect your results. Meanwhile, the cutter head whittles away the excess material to achieve the thickness you want. Finally, the outfeed roller is there to support the wood as it exits the machine, making sure everything stays aligned.
One important tip: always check that your infeed and outfeed tables are lined up properly with the planer bed. If they’re off even a little bit, you might end up with that frustrating snipe problem—those annoying dips at the ends of your boards. Why does this matter? Because the little things, like table alignment, can make a big difference in your final product. Using tools like precision hand reamers can help maintain alignment accuracy during planer adjustments.
How to Identify Planer Snipe on Your Wood?
How do you know if your wood has suffered from planer snipe? Start by checking the leading and trailing edges of the board for deeper cuts. You’ll typically find these noticeable indentations affecting the first 3-4 inches. When you see cuts like this, it’s a sign that the board might have varying thickness, which can really mess up your project.
Here’s a simple trick: grab some mineral spirits and use raking light to inspect the surface. This combo helps highlight those subtle dips and will show you exactly where the snipe has occurred. But don’t just rely on your eyes; give the surface a good tactile assessment. Run your fingers across it. If certain areas feel inconsistent or bumpy, that’s another clue that the wood isn’t evenly thick.
Using a cordless miter saw with adjustable angles can help reduce the chances of planer snipe by ensuring precise cuts.
The Importance of Proper Board Support During Planing
Have you ever struggled with getting a perfectly flat surface on your wood? If you’ve dealt with end dips, or what’s often called snipe, you’re not alone. Proper board support while planing is key to achieving that smooth finish we all crave.
One of the simplest tricks I’ve learned is to use longer pieces of material—MDF works great—for the in-feed table and out-feed roller. This extra support makes a huge difference in keeping everything stable. Keeping those surfaces level with the planer bed is essential so you don’t run into alignment issues later on. If the board starts lifting at the ends, you’re definitely going to see some snipe happening.
Here’s the trick: when you feed the board through the planer, lift the free end just a bit. This little action can help counteract the natural tendency for the wood to lift, which reduces that pesky problem of having deeper cuts at the ends.
Another simple step is to position sacrificial boards before and after your workpiece. These extra boards can absorb some of the pressure from the rollers, which helps stop snipe in its tracks. Honestly, it’s all about keeping uniformity throughout the process to maintain that quality finish.
Using a properly designed outfeed roller stand with sufficient load capacity and height adjustment can greatly improve the stability of your board during planing.
In short, stay mindful of board support to keep your planing game strong. What tips do you swear by when working with your planer?
Preventing Planer Snipe: Four Essential Techniques
Have you ever finished a project, only to notice those pesky snipe marks on your boards? It can be really frustrating when your hard work gets marred by imperfect cuts. So let’s dive into some practical tips to help you prevent planer snipe and keep your woodworking looking sharp.
First off, leveling your infeed and outfeed tables with the planer bed is crucial. If they’re off, you might end up with uneven cuts that lead to snipe. It seems simple, but it’s worth double-checking every time you set up. Speaking of setups, you’ll want to make sure that longer boards are well-supported. Whether you’re using stands or getting a buddy to help, don’t let the ends dip while you feed the board through.
Now, here’s a trick: take smaller cuts. Keeping your depth to about 1/64 inch can really help reduce the downward pressure from those rollers, which is often the culprit behind snipe marks. And if you really want to take it up a notch, consider using sacrificial boards at both ends of your material. These extra pieces absorb some of the pressure and help prevent deeper cuts on your main workpiece.
Don’t forget about regular maintenance checks, too. Tightening those table bolts can make a surprising difference in how well your planer performs. It’s those little housekeeping tasks that often get overlooked but can save you from a lot of headaches down the line.
To wrap it up, preventing planer snipe involves checking your table alignment, supporting your boards, making smaller cuts, and paying attention to maintenance. Using precision adjustment methods like those found in the best router lift tables can inspire greater accuracy in your overall woodworking process. So next time you’re in the shop, remember these tips and hopefully, you’ll be able to create clean, flawless pieces without the annoyance of snipe marks. How do you deal with snipe in your woodworking projects?
Recommended Products

BENCH TOP BOARD MILL - The XL model accomodates boards up to 24" wide and from 3/4" - 3" thick. The XL Rout-N-Plane router sled is designed for tables at least 32" wide.
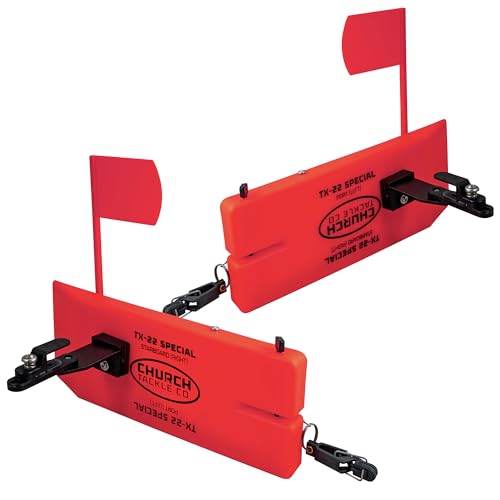
(2) TX-22 Special Reversible Board

(1) OR-12L Side Planer
How Sacrificial Boards Help Minimize Planer Snipe
Have you ever finished planing a board only to find those pesky little dips at the ends? That’s probably snipe, and it can be a real pain. Thankfully, there’s a pretty straightforward trick to help eliminate it: sacrificial boards.
These are extra pieces of wood that you can place at the front and back of your actual workpiece. They help absorb the pressure from the rollers as it passes through the planer, which means your board doesn’t take the hit. Here’s a key point: make sure those sacrificial boards are the same thickness as your workpiece. This helps keep everything nice and level, preventing uneven pulls that cause snipe.
Setting them slightly lower than your actual workpiece can also work wonders. By doing this, you give the ends a gentle lift as they enter and exit the planer, which further reduces snipe. Not only does this create a more stable feed path, but it ensures that your workpiece stays in contact with the planer bed. And when you’re done, trimming away those sacrificial pieces is easy – your boards will be clear of any marks.
For consistent results, consider using tools with reliable depth adjustment mechanisms to maintain precise control during finishing.
Recommended Products

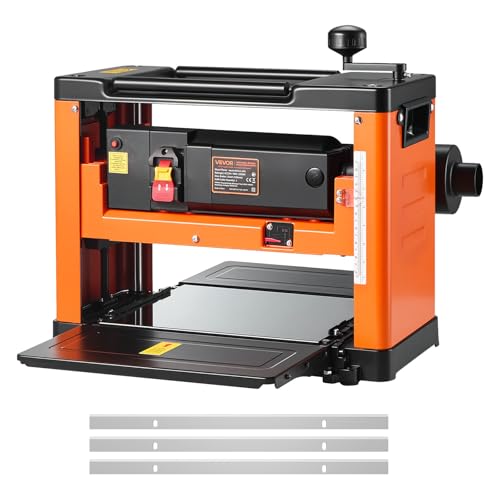
【2-Speed Adjustable Feed Rate】 Switch between 21 FPM (fast roughing) and 12 FPM (smooth finishing) for efficient material removal and tear-free surfaces. Perfect for hardwoods like oak, maple, and softwoods.

Voltage: 220 - 240 V

13 in. 2-Speed Thickness Planer, & Dust Hose Adapter
Adjusting Your Planer’s Infeed and Outfeed Tables for Best Results
Ever get frustrated with snipe when you’re planing wood? It’s a common issue, but there are steps you can take to tackle it head-on. Start with your infeed and outfeed tables—getting them adjusted just right can make a huge difference.
First, set the infeed table slightly lower than the cutter head. This way, you’ll have a smoother entry for your boards. Align your outfeed table with the exit of the cutter. This ensures that the board has constant support as it moves through, helping to prevent those pesky dips.
Here’s a quick tip: Regularly check and tighten those adjustment bolts. Loose bolts can lead to misalignment, which is a big contributor to snipe. It doesn’t take long, and it can save you a lot of headache in the long run.
Want a faster solution? Using a jointer sled can speed up the alignment process without the need to measure everything meticulously. You’ll get those tables lined up just right in no time.
Also, keep an eye out for wear on the table surfaces. Dings or dips can mess with your setup, leading to more snipe than necessary. Maintaining those surfaces is key to keeping everything aligned, ensuring your boards come out smooth and straight.
Using durable high-quality materials in your planer components can also improve the accuracy and longevity of your adjustments.
Recommended Products

Maximum versatility

FEATURES: Pre-drilled holes for mounting the Delta 22-590 and TP305 portable planers

Stand up to any Challenge: Get ready for added security during all your difficult projects! The tool stand boards are up to 27.7"/ 70.3 cm long and 24"/ 60.3 cm wide. Durable and stable under 100 lbs/ 45 kg heavy loads. Metal top provides a reusable work surface, and pre-drilled holes allow for quick mounting of the planer to a stand.
Getting the Most Out of Cutech Planers to Reduce Snipe
Getting the Most Out of Cutech Planers to Reduce Snipe
Are you struggling with snipe when planing wood? You’re not alone. It’s a common issue many DIYers and woodworkers face, but with the right techniques, you can minimize it significantly—especially when using Cutech planers like the 40200H, 40600H, 40700H, and 40800H.
Here’s the trick: on the 40200H, adjust the SNIPE LOCK feature. It helps prevent the cutterhead from lifting at the end of the board, which is often the culprit behind those annoying snipe marks. For the other models, take advantage of the SNIPE MINIMIZER system. This system uses four lead screws to spread out the pressure from the rollers more evenly, making a noticeable difference in the quality of your cuts.
Speaking of techniques, have you tried using sacrificial boards? They can work wonders! By placing them at the front and back of your stock, they can absorb any uneven pressure during feeding, which helps further reduce snipe.
Another easy fix is to adjust the height of the cutterhead. Make sure that it matches the thickness of the wood you’re working on. This simple step can lead to smoother transitions as the wood passes through the planer, enhancing performance and cutting down on snipe.
Additionally, maintaining your planer with durable, high-quality bits designed for precise cutting can improve overall woodworking results and reduce defects like snipe.
To sum it up, effectively reducing snipe is about knowing your tool and applying a few practical strategies. What methods have you found helpful in tackling snipe in your woodworking projects?
Recommended Products

CUTECH SPIRAL CUTTERHEAD - Cutterhead with 6 rows that holds staggered inserts for a smooth finish. The spiral cutterhead is known for its reduced noise levels and smoother finishes, making it ideal for beginners who want professional results without frustration. The design of the cutterhead along with the use of in-house made inserts make cuts with the lowest amp draw compared to others.

Plane boards up to 6 inches thick and 12.5 inches wide

Includes: One set of catfish side planer boards (2 boards), all hardware needed to pull baits and catch fish!
Tips From Experienced Woodworkers on Avoiding Planer Snipe
Planer snipe can be a real headache for woodworkers, can’t it? If you’ve ever struggled with those annoying little dips at the ends of your boards after running them through a planer, you’re not alone. Thankfully, seasoned woodworkers have come up with a few tricks to tackle this issue, and trying them out can seriously improve your results.
First off, don’t skip the jointing step. Making sure the initial surface of your wood is jointed helps in achieving parallel cuts. This makes a big difference in how your board rides through the planer. Also, check to see that your infeed and outfeed tables are aligned with the planer bed. If they’re off, you risk having unsupported ends, which can lead to more snipe.
Here’s the trick: consider using sacrificial boards at both ends of your workpieces. By placing these boards on the ends, they can take the hit instead of your actual project piece, absorbing any potential snipe. And when feeding your board through the planer, try lifting the back end a bit. This small adjustment can help, too.
Taking shallower cuts is another important factor to keep in mind. Aim for cuts no deeper than 1/64 inch. Why does this matter? Reducing the pressure from the rollers can go a long way in minimizing snipe. Using tools with features like adjustable bevel angles can also help make precise cuts that prevent damage along board edges.
Frequently Asked Questions
How to Prevent Snipe on Planer?
To prevent snipe on our planer, let’s guarantee proper blade alignment, adjust the feed rate according to wood thickness, and maintain our planer setup. Regular maintenance tips will also keep our equipment running smoothly.
What Is Snipe From a Planer?
Snipe from a planer’s like uneven waves on a pond’s surface—it marks our wood with deeper cuts at edges. It’s affected by planer types, wood thickness, cutting depth, blade alignment, and feed speed.
How Does a Planer Work Step by Step?
First, we choose a planer type, adjust the cutting depth, and set the rollers. Then we connect dust collection, feed the board, and maintain the blade for ideal performance. Finally, we monitor for consistent thickness.
What Causes Snipe?
Snipe’s caused by pressure variations during planing, leading to uneven cuts. We can improve workpiece stability with proper support and make tool adjustments to minimize snipe. Let’s focus on consistent pressure to prevent these issues.


